DIY Little Lace Dress

DIY Little Lace Dress via Needles + Leaves

When planning my daughter Indy's last photo shoot before starting Kindergarten, I knew I wanted two things for sure: a fresh flower crown and to make her dress myself.  For her flower crown, I simply followed Tawni's DIY Succulent Crown tutorial using real fresh flowers instead of succulents.  As for her dress, I started by buying fabric that I thought would be pretty and went from there.  I made the dress about an hour before the shoot and it was so simple I thought I should share it as a DIY.

Diy Little Lace Dress and Flower Crown via Needles + Leaves

Supplies I Used:

Ivory Thread

1 1/2 yards Ivory Cotton Fabric

2 yards Ivory Lace Fabric

Ivory Zipper

Fabric Scissors

Tape Measure  

Sewing Pins

1. I started by measuring my daughter. She is 4 1/2 years old and very petite so make sure to take your own measurements as well. 

These are her measurements:

  • Total length of the dress: 25" long.  (from the top of her chest to her ankles) 
  • Total for the top bodice: 4 1/2"  long.
  • Total circumference for top bodice: 21" (I decided to make the dress a tube top, so I wanted the bodice very tight.) 
  • Total for the lace skirt bottom: 21" long x 45" wide.

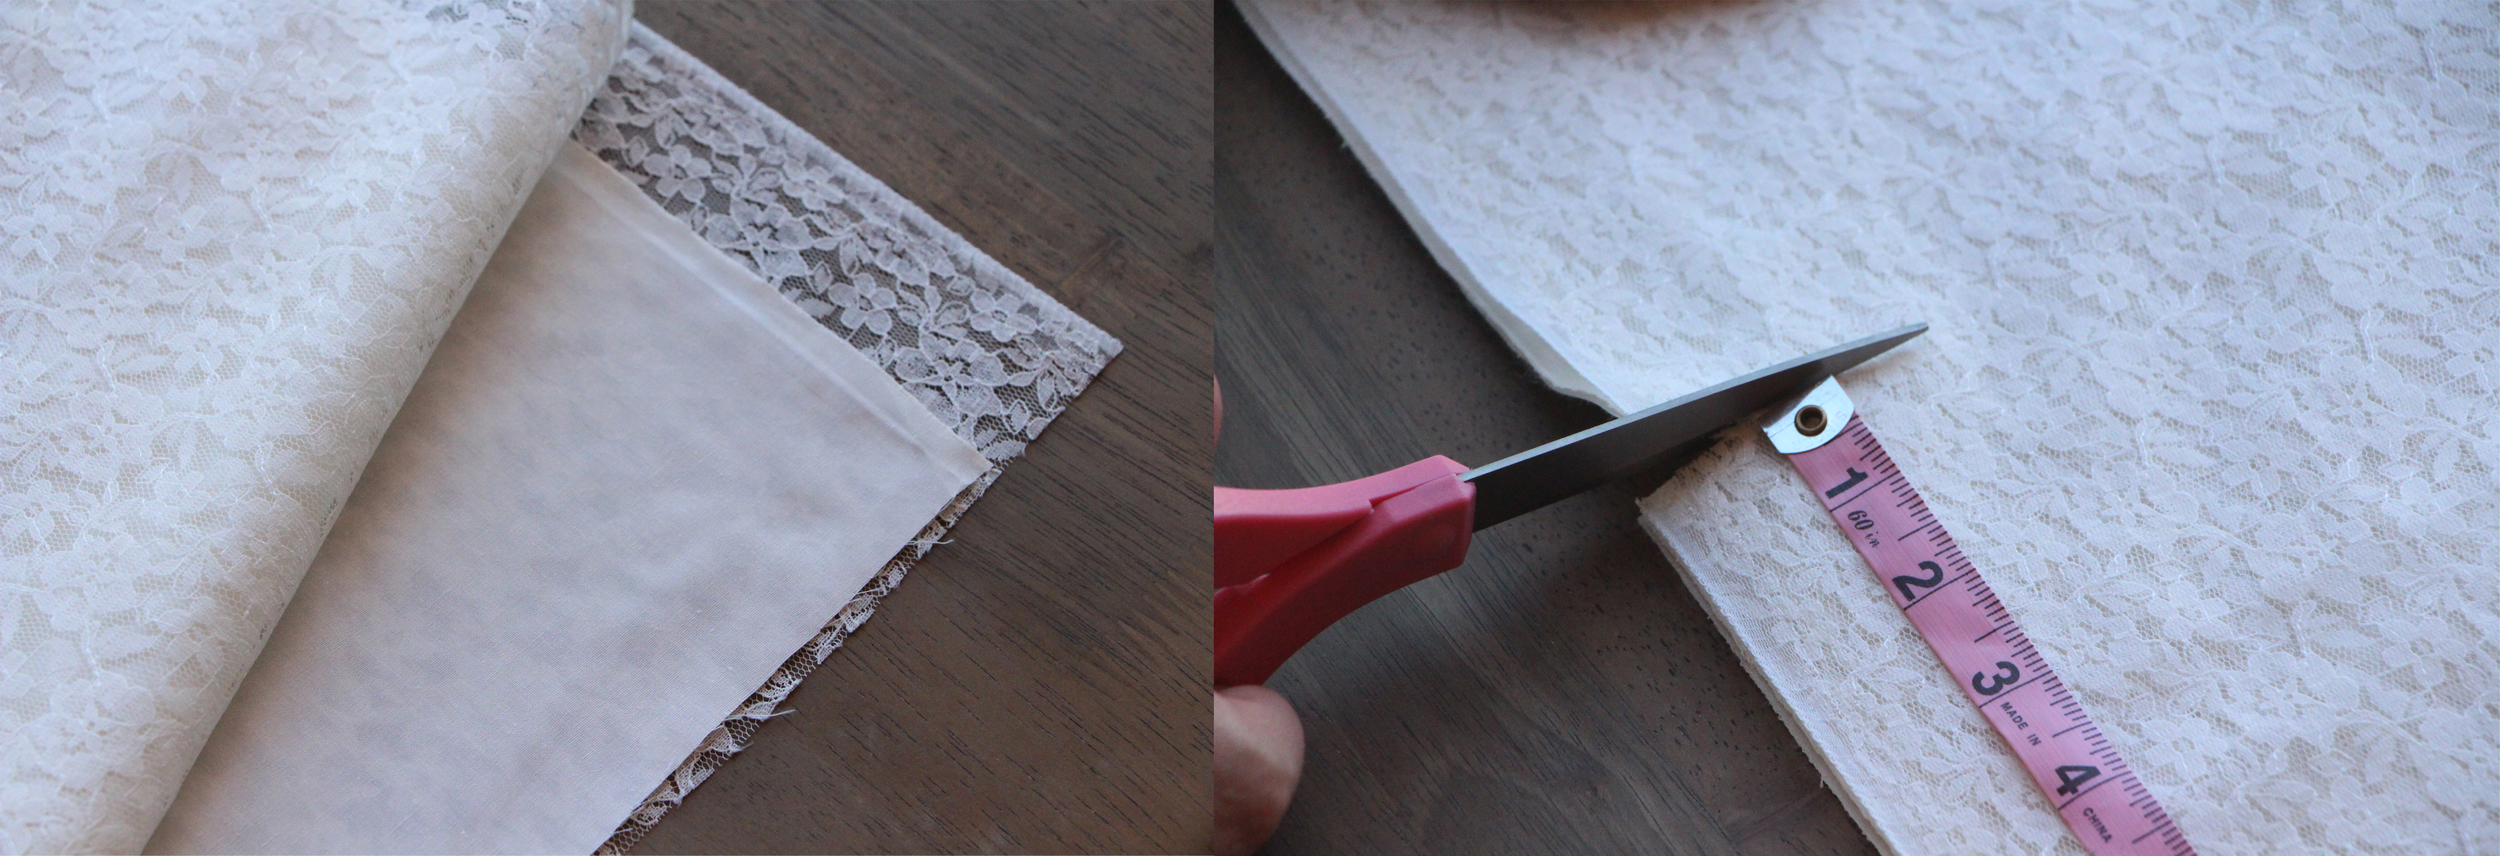
2. After taking these measurements I started cutting. I began with the cotton fabric.

For the bodice I needed to cut a piece 4 1/2 L. x 10 1/2" W. I folded the fabric in half and cut 2 pieces at a time.

DIY Girls Lace Dress

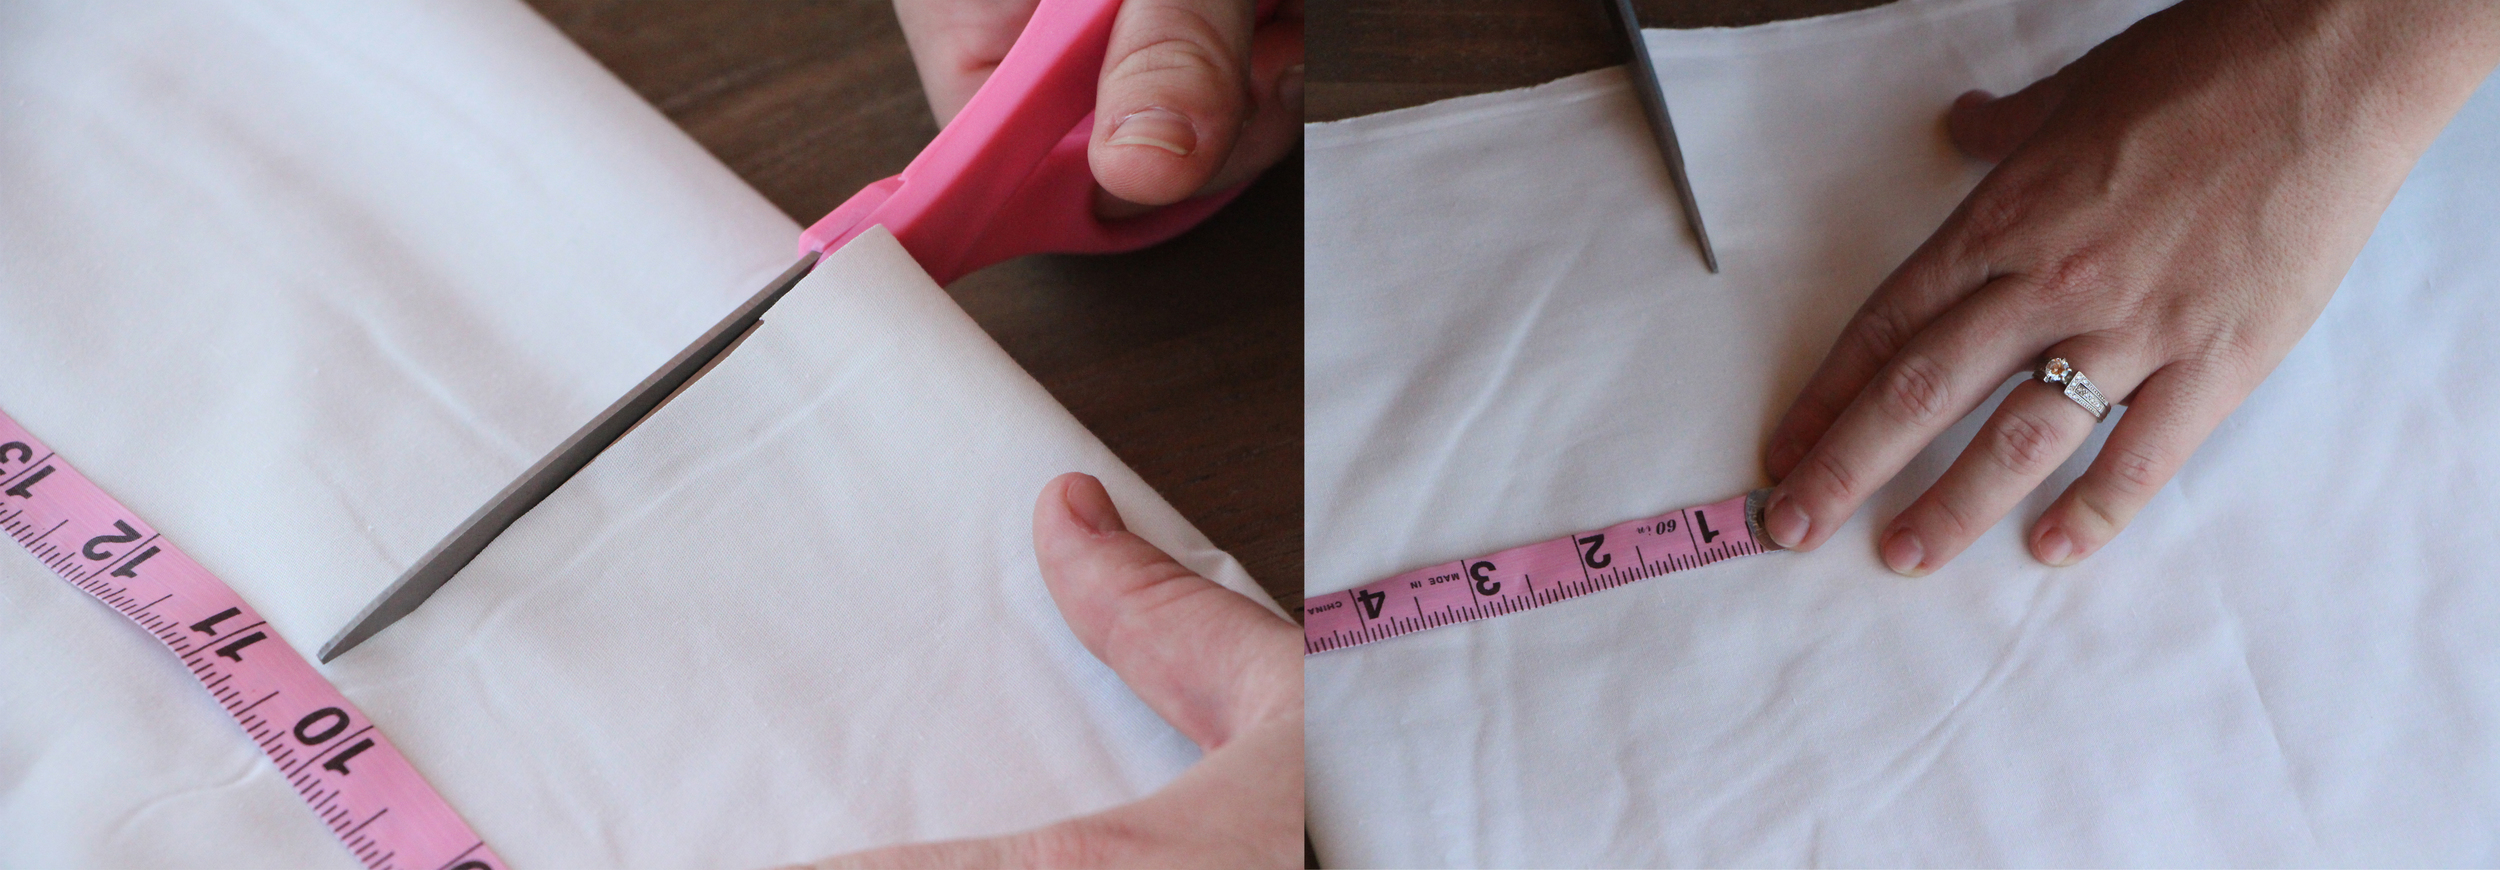
The ivory fabric I bought was a bit see through so I needed to make the dress double layered. If you are using a darker color or a thicker fabric you can skip to step 4.

3. You will need to cut another 2 pieces. 2 for the front and 2 for the back to make it double layered.  Once you made your first cut in step 2, just lay that piece on the fabric and cut again.

DIY Girls Lace Dress

Now you have your front and back for the bodice! 

DIY Girls Lace Dress

4.  Next we can cut the fabric for the skirt portion. The skirt is also two layers. The bottom layer is the cotton fabric and the top layer is the lace. I laid the lace fabric on top of the cotton fabric so that I could cut them together.  Now I cut both fabrics together 21" L. x 45" W.

DIY Girls Lace Dress

Now that we are done with cutting, We can start sewing!  

5. Let's start with the bodice, If you are doubling up the layers, we need to sew them together individually first. Take 2 of the 4 pieces we cut in the beginning, pin them together and sew along 3 of the 4 sides a 1/4" seam leaving the bottom unsewn. Now turn it right side out. Repeat with the other 2 pieces.
*If you are not doubling up your fabric, start by folding down the top of your 2 pieces of fabric 1/2" and iron. Then sew a 1/4" seam. 


To finish the bodice pin the 2 finished pieces together along the left and right sides and sew together to create a tube.

You can leave the bottom of the bodice unfinished because the lace skirt will be sew on top.  

DIY Girls Lace Dress

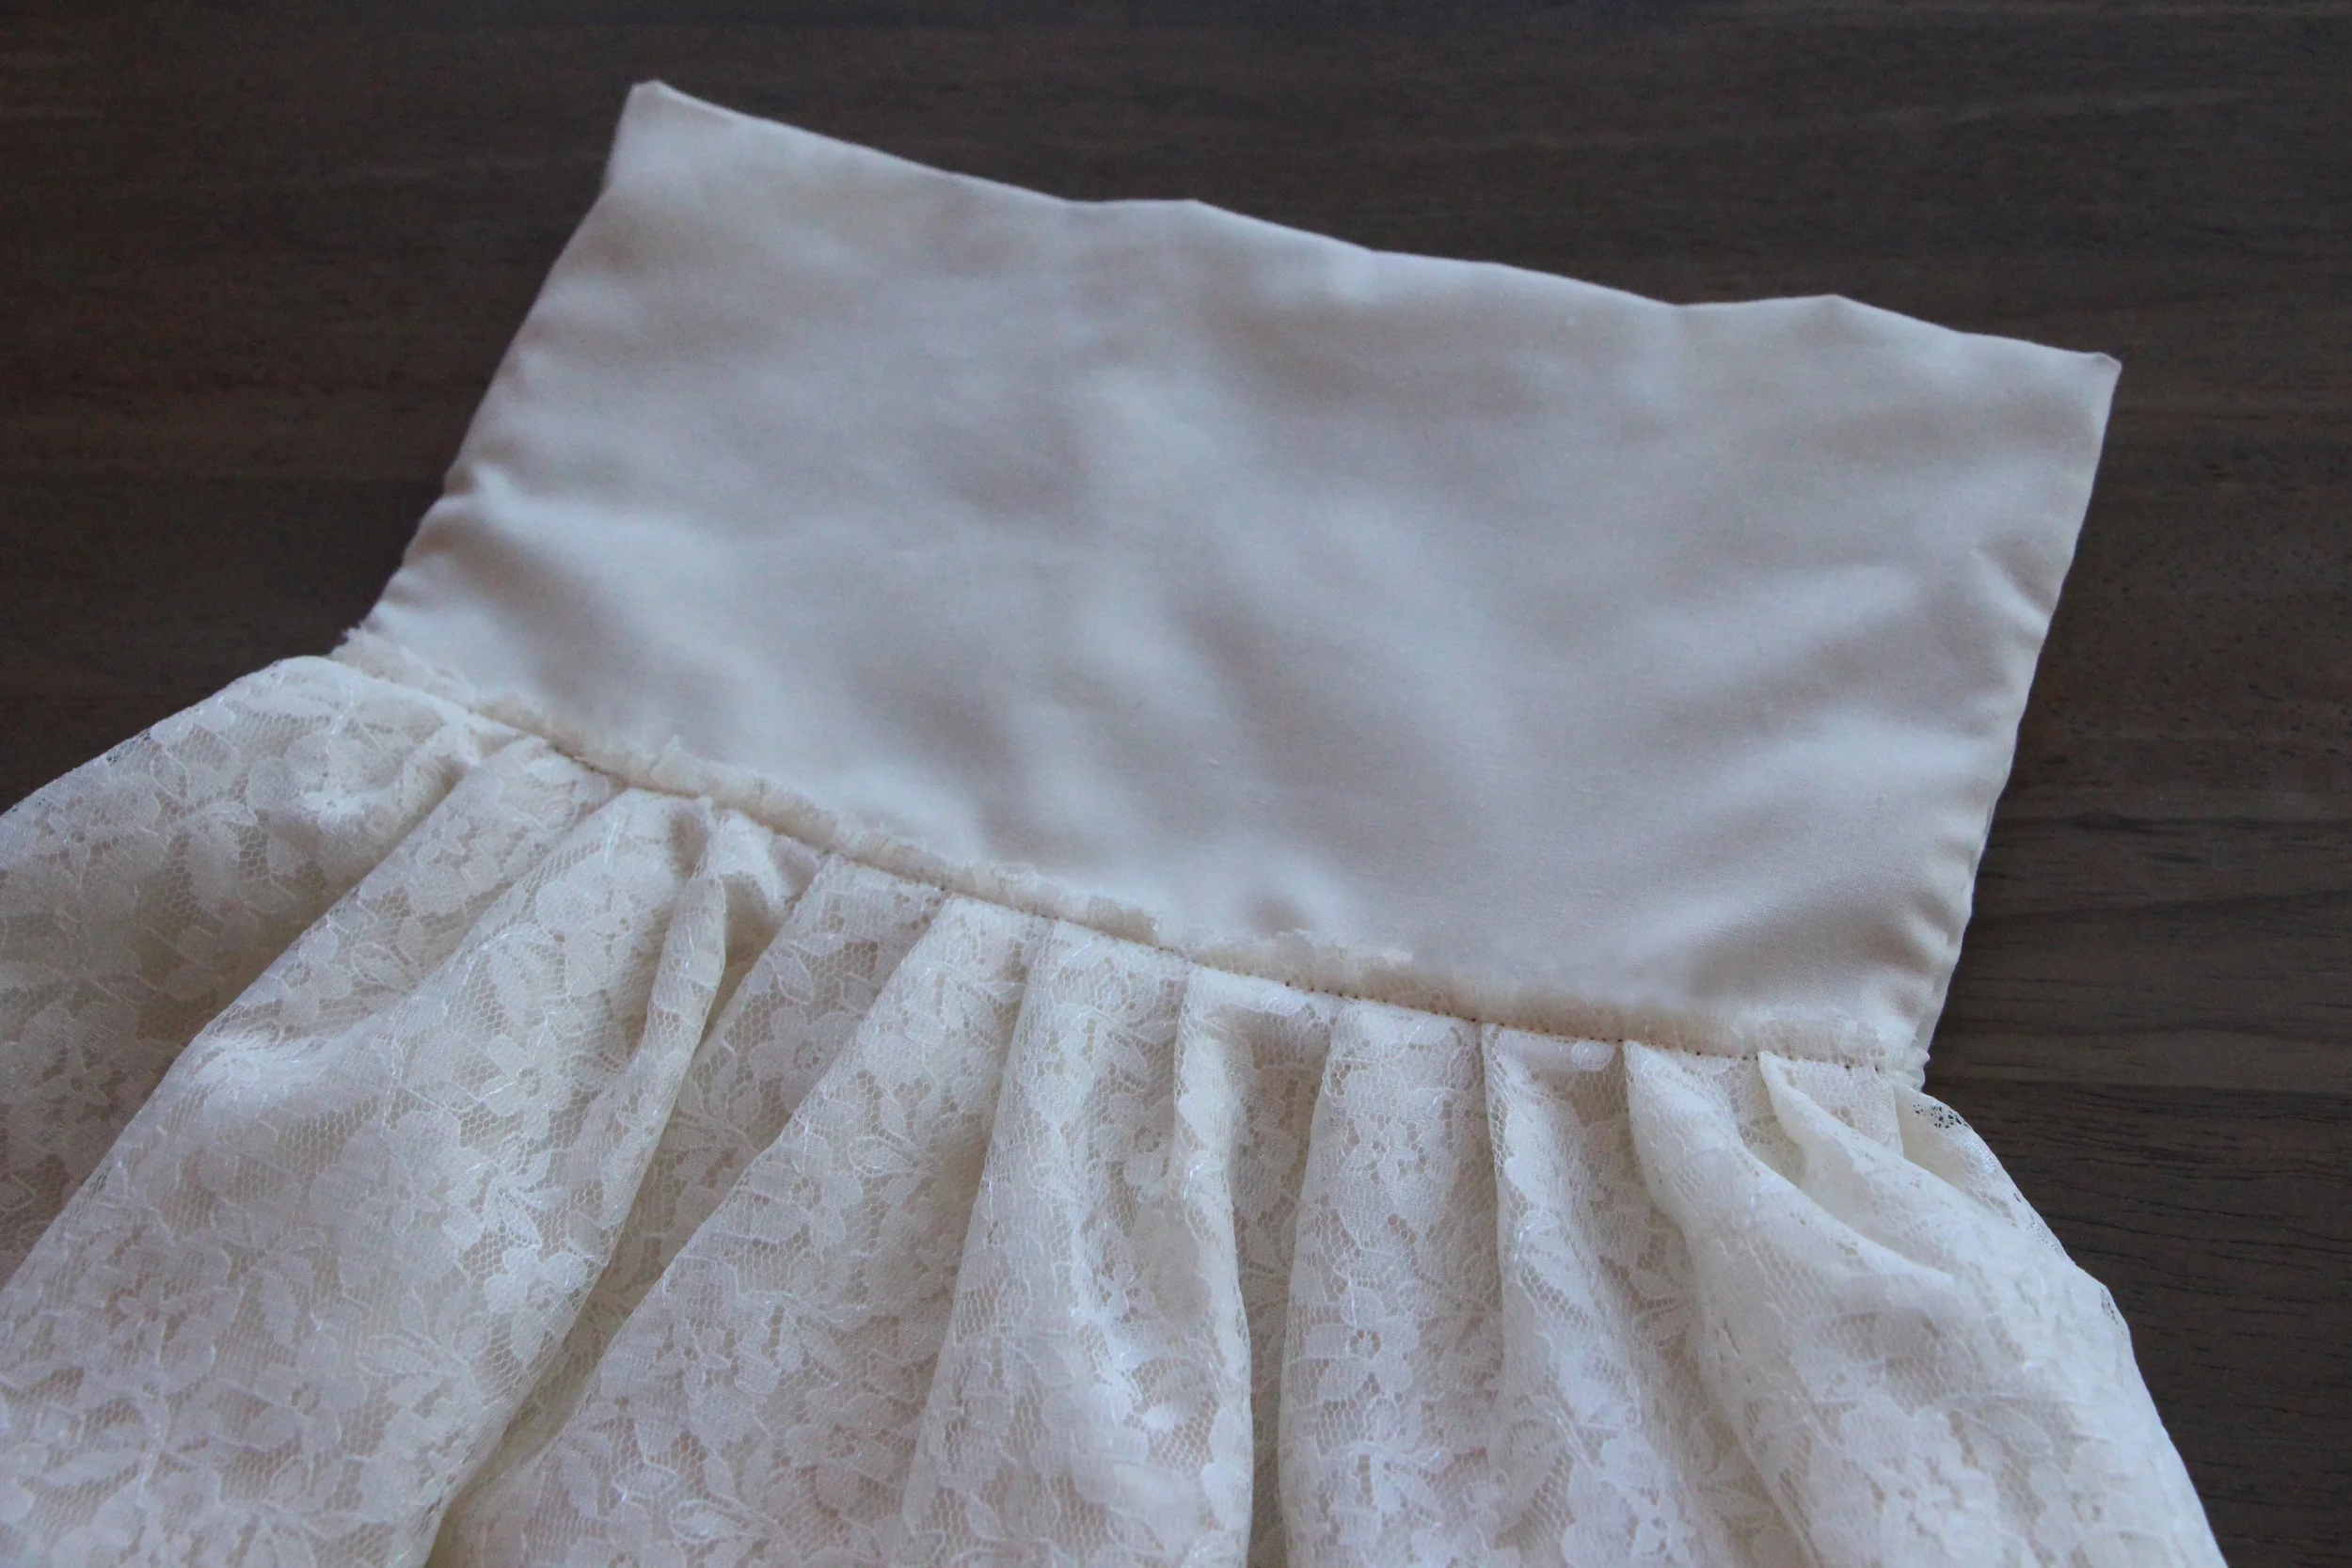
6. Next we can attached the bodice to the lace skirt. Start by pinning the lace and cotton we cut earlier to the bodice in the back.  I pleated it 1/2" apart to make the dress flow better all the way around. The skirt will start to overlap. This will help the dress close in the back. 

DIY Girls Lace Dress

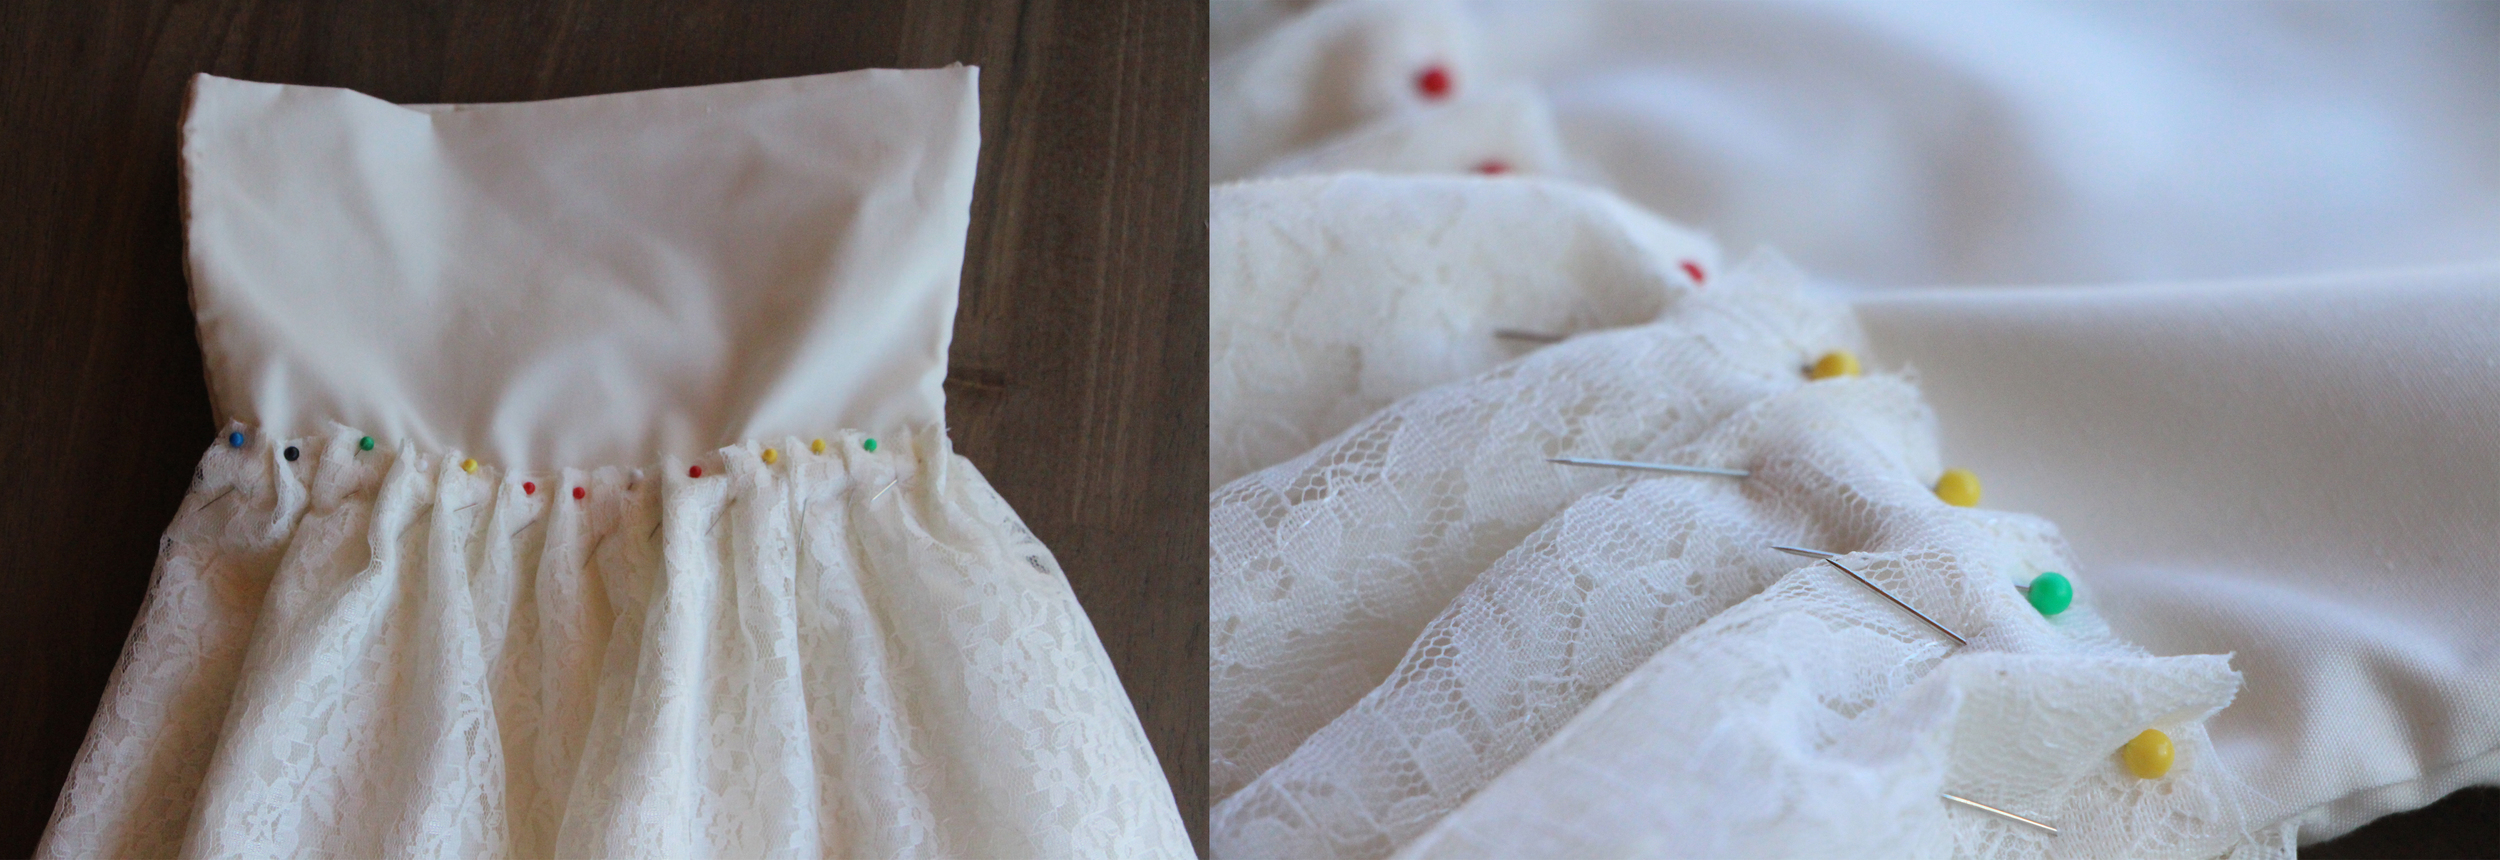
7. Now start sewing the top and bottom together.   

DIY Girls Lace Dress

Here you have the sewn bodice!

DIY Girls Lace Dress

8. Now we have the zipper, first you need to trim your zipper to the length you want on the dress. I trimmed mine to about 11". Fold your dress inside out and unzip the zipper. (not all the way.. the zipper will come off!) lay the zipper on the dress and cut a straight line down the back of the dress about an inch from the end of the zipper. Now pin your unzipped zipper to the dress and sew.

DIY Girls Lace Dress
DIY Little Lace Dress via Needles + Leaves

9. For a little extra cuteness I added a little strip of lace to the front of the bodice.  I didn't want to sew to much on the lace so I sewed it along the sides and a a few stitches in the middle. 

DIY Girls Lace Dress

10. Viola! We have a little lace dress. The dress was exactly what I imagined and it looked adorable on Indy!  I hope you enjoyed following along in this tutorial! Feel free to leave a comment below if you have any questions or need help! Check out our stylized photo shoot featuring this dress. Find me on Instagram under @kristaandleaves or  @needlesandleaves.

DIY Girls Lace Dress via Needles + Leaves

Propagating Succulents

Propagating succulents via Needles + Leaves. Learn how to propagate succulents from leaves and cuttings.

How to propagate succulents from cuttings and leaves.

If you’re anything like me, you probably love to have succulents in the house. I try to keep them in bright windows that get plenty of light, but sometimes they can still get leggy. This happens when a plant isn’t getting enough light and it starts to stretch out causing the stem to grow long and the leaves to become widely spaced. 

Notice the long stem and widely space leaves.

Notice the long stem and widely space leaves.

If you have a plant that is starting to become leggy like this one, have no fear!  This is the perfect time to propagate!


Gorgeous Succulent Plant: Propagating Succulents via Needles + Leaves. Learn how to propagate succulents from leaves and cuttings.

Although this plant still looks gorgeous from the top, the lower leaves will begin to wither and fall off and soon we’ll be left with a rosette high above the soil on a long bare stem.  So before the leaves start to die, let’s pull them off and propagate them to make more plants.  Succulent propagation is easy, fun, and free!

Removing succulent leaves: Propagating Succulents via Needles + Leaves. Learn how to propagate succulents from leaves and cuttings.

We’ll start by removing the lower leaves first. Be really careful when you remove the leaves from the stem.  I hold the leaf firmly and wiggle it from side to side until I feel a little snap.  You want to be sure you get the entire leaf.  If you rip the leaf, leaving the base still attached to the stem, it will not be able to grow roots or a new plant.

Succulent Leaves: Propagating Succulents via Needles + Leaves. Learn how to propagate succulents from leaves and cuttings.

This is what the leaves will look like if they are properly pulled from the stem remaining fully intact.


After you have successfully removed the lower leaves you will be left with a small rosette on a long bare stem.  I like to call the next step decapitation propagation. Not sure if that’s the technical term, but it rhymes and we’re going to cut its head off so…

Propagating Succulents via Needles + Leaves. Learn how to propagate succulents from leaves and cuttings.

I use a pair of craft scissors, but a sharp knife would work great as well.


Propagating Succulents via Needles + Leaves. Learn how to propagate succulents from leaves and cuttings.

We now have a bunch of leaves, a stump and a cute little plant with a short stem.

Succulent and Leaves: Propagating Succulents via Needles + Leaves. Learn how to propagate succulents from leaves and cuttings.

Now we wait. Before we can place our leaves on soil to begin growing new plants we must let the ends dry out and callous over.  This step is vital! If you don’t let the ends dry out and place them directly on soil they will absorb too much moisture and they will rot and die.  In addition to letting the leaves callous over, we must also let the end of the stem on the rosette dry out as well.  This could take anywhere from a few days to a week or so. 

Once you feel like the ends are dry enough, you can place them on top of some well-draining cactus or succulent soil. (Some people dip the ends in a rooting hormone, but I’ve never tried this and have had great success without it.) I’ve had the best results when keeping my leaves indoors in a window with lots of indirect sunlight.

After a few weeks you will see little pink roots sprouting from the ends of the leaves and then teeny tiny baby plants will begin to grow. I water the leaves very rarely until I start to see roots or babies appearing.  

At this point I will give the roots or baby plants a good soak about once a week or whenever I notice the soil is totally dry.  Just like with a fully developed succulent, too much water is not good. If you want to be certain not to over water, I recommend spraying the ends of your leaves with a spray bottle once a day instead of completely soaking the soil. 

Propagating Succulents via Needles + Leaves. Learn how to propagate succulents from leaves and cuttings.
Propagating Succulents via Needles + Leaves. How to propagate succulents from leaves and cuttings.
Propagating Succulents: Learn how to propagate succulents from leaves and cuttings.

I let my baby plants grow in rows like this until I start to notice the “mother leaf” starting to wither.  At that point I will carefully remove the leaf in the same fashion I removed it from the original stem, and then place the baby plant in its own pot. This can be tricky as you don’t want to accidentally remove the roots with the leaf, so you may want to play it safe and let the leaf fall off on its own.

Keep in mind, not every leaf will grow a new plant.  I’ve found that some leaves just wither away, some will take root while never growing a new plant, and some might even grow a plant, but never root. Although there will typically be a small amount of losses, most leaves will grow roots followed by a new plant.  The three leaves below were all started on the same day and all three had different outcomes.

how-to-propagate-succulents-from-leaves-and-cuttings-needlesandleaves_net.jpg
Baby Succulents: Propagating Succulent via Needles + Leaves. Learn how to propagate succulents from leaves and cuttings.

I ran out of individual little pots with this batch so I just removed the leaves as they withered and left the plants to grow together like a little succulent forest.

Okay, back to that stump. Don’t worry no part of this plant is going to go to waste!

Succulent Stem: Propagating Succulents via Needles + Leaves. Learn how to propagate succulents from leaves and cuttings.

Simply put this pot aside and eventually it will begin to sprout new plants from each place we removed a leaf!

Propagating Succulents via Needles + Leaves. Learn how to propagate succulents from leaves and cuttings.

Now back to our original plant, the reason we did all this!  Once the stem has dried out and calloused over, simply place your plant back in a pot with well-draining cactus or succulent soil and it will grow roots again and continue to flourish! Isn’t succulent propagation amazing?


Propagating Succulents via Needles + Leaves. Learn how to propagate succulents from leaves and cuttings.

All of my information comes from personal experience.  I’m sure all succulents propagate differently and plants in different climates and environments require different care. This is what has worked for me and I hope it works for you! Please let me know if you have any questions.  You can find me on Instagram under @tawwni or @needlesandleaves or leave a comment below!

(The plant featured in this post is available for purchase at Planet Desert.)


Related

How to Save Your Succulents From Mealybugs

How to Save Your Succulents From Mealybugs

Tips For Growing Healthy Succulents

Tips For Growing Healthy Succulents